Summer Show 2014


All Groups
- - - - - - - - - - - - - - - - - - - - - - - - - - - - - - - - - - - - - - - - - - - - - - - - - - - - - - - - - - - - - - - - - - - - - - - - - - - - - - - - - - - - - - - - - - - - - - - - - - - - - - - - - -

Ryan Davies- Understanding Architectural Materials and Space

My aims for my FMP were to understand and contrast old and new architectural materials and space. I wanted to progress from my project 10 by experimenting more with architectural materials that are stronger and harder to work with.


At the beginning of my FMP I started to collect research from a variety of artists that work with found materials and how they use techniques to create their art. My biggest inspiration was Doris Salcedo as she uses techniques to rebuild old objects such as wooden wardrobes. I began to gather a large range of run down materials which had been left unattended at the back of college. I wanted to create interventions similar to Doris Salcedo, I created a range of interventions such as a smashed up bollard that was rebuilt using newly learnt techniques with plaster, a broken brick that I rebuilt using clay, a smashed up wooden stool that I fixed using plaster and I attempted to rebuild a broken clay pipe but this was the only intervention that didn't go to plan and I was unable to achieve my aims of fixing this using plaster. After my experimental stage I wanted to create a piece of work that worked more with space and began building random 3D models using plastic strips, concrete slabs and foamboard that worked more with architecture. I then went on to create six wooden models using planks that had been cut to represent the positive and negative space of three different stones. Three of the models were random and the other three were determined by the shape of the stones themselves.


This set me up for my final piece which was made using lots of breezeblocks that I was I was given permission to use by college. Seeming as though the breezeblocks were on college grounds I decided to use them to create a large piece of practical work for my final piece. Unfortunately college wanted them back after my exhibition was over so I was not able to break them up; this meant I couldn't contrast the old and new as well as I would've been able to. After transporting all of the breezeblocks I was allowed to my space I began to create a range of different structures. I experimented with the breezeblocks until I came up with my final piece which involved a long curved wall that went from one side of my space to the other. As I built each layer up I moved the blocks inwards so that the wall was curved and played with space, stability and balance. I would've liked to have built the wall higher up but unfortunately I wasn't allowed to take any more of the breezeblocks that were left in college. I like how my FMP and final piece turned out as I have been able to work with more architectural materials by using new techniques whilst also contrasting the old and the new.


- - - - - - - - - - - - - - - - - - - - - - - - - - - - - - - - - - - - - - - - - - - - - - - - - - - - - - - - - - - - - - - - - - - - - - - - - - - - - - - - - - - - - - - - - - - - - - - - - - - - - - - - - -

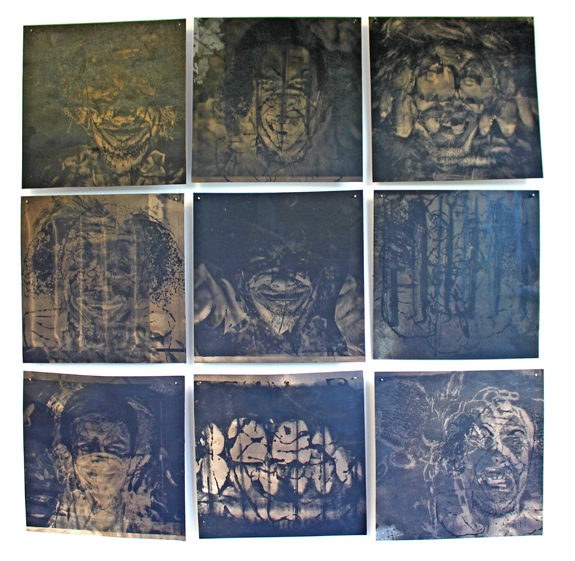
Egle Sviderskaite - Dentists Ruin People's Lives

This project is based on how fear affects different kinds of people. Fear isn't something that you can get over easily. It can prevent people from doing simple tasks, undermine people's confidence and jeopardize success. In extreme instances it can ruin people's lives. The way I approached the project was that I imagined I met a person who didn't understand fear and I was trying to explain it to them.


I made a documentary in which people reacted to pictures of the common phobias; also I asked them about their past experiences that might have scared them. The video showed me that most people try to hide their fear behind a smile and usually don't open up enough to talk about their fears. The video had a real contrast between the people that expressed their emotions really well and the ones that kept their answers really simple and short which had a quite comedic effect on the video.


After the video I went on to recording audio clips of me smashing glasses and cups then scratching a fork against a plate. The reasoning for doing this was so that the recorded sounds would make the listener uncomfortable, the sounds will be played all throughout the exhibition at completely random times so that whoever is at the exhibition will feel anxious as they won't know when the sound will be played and which sound will be playing.


I produced a set of lollipops by sticking teeth together in a round shape and then poured melted candy on top, I was trying to play on the idea of dentistry as I have a serious phobia of the dentist. I tried to make the lollipops look quite disturbing so they would fit in with the project and making people feel uncomfortable looking or touching them.
The last of he exhibited work is my bitchemin prints. I layered a set of photographs on top of one another using cartridge paper and then poured bitchemin and white spirit on top to create a very dark and grimy look. The pints don't look very clear from a distance but from up-close you can start making out all the little details from the photos within the print. I feel like the photos will work very well with the sounds because whilst the people are focusing on the prints the loud sound clip might start playing and might startle them.
I feel like the atmosphere in my exhibition space will cause discomfort and that all the combined factors of the project will help people experience little flashes of fear themselves and will help them understand what people with major phobias go through.
The last thing that I did in this project was a group critique from which I received comments about how effective my video Is at projecting people's emotions on a subject that some people don't even take seriously. The video itself moved from making people laugh to them realising on how serious a phobia really is.


- - - - - - - - - - - - - - - - - - - - - - - - - - - - - - - - - - - - - - - - - - - - - - - - - - - - - - - - - - - - - - - - - - - - - - - - - - - - - - - - - - - - - - - - - - - - - - - - - - - - - - - - - -

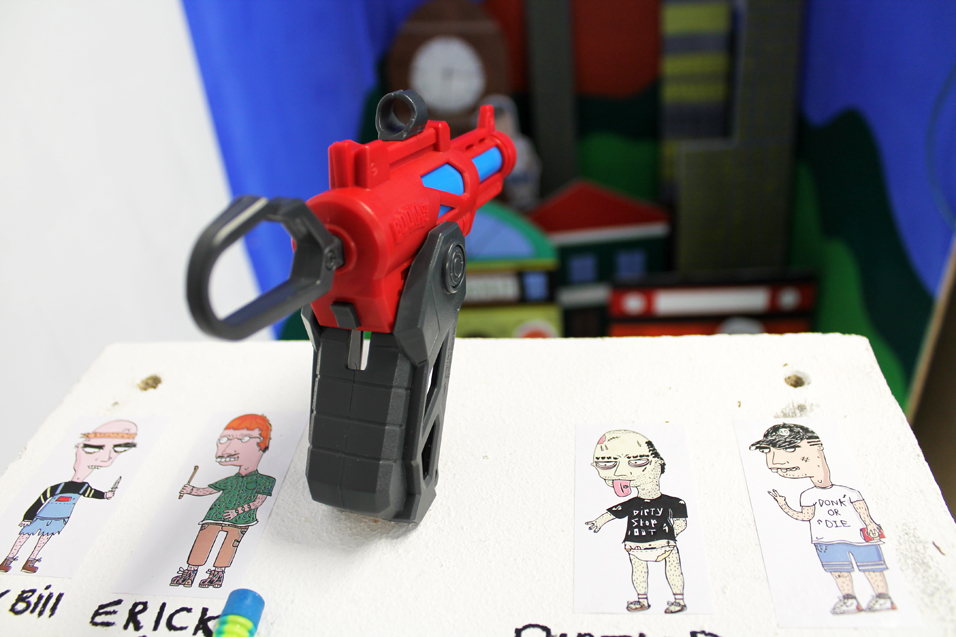
Dominic Saulter - Society Shoot Out

This project Is based on Society Stereotypes looking at how people can be put into social groups purely by their appearance and how they can be rejected and put into different chains and orders of society , Starting by using google to explore the kind of descriptions and images that were shown when I searched in some of the society genres today , From this I then went on to look at different illustrative styles as this would be a way I would portray this theme into art work , Taking inspiration from Illustrators such Mike judge and Jay Howell who create fictional characters in the art world today I went on to create characters linking to my chosen stereotypes experimenting and taking inspiration from there cartoon based illustrative styles.


As well as illustration I would also look at create real life characters on video and portraying myself into different scenes and social movements inspired by the work of the artist Cindy Sherman , I was also highly inspired by an Independent film called "Dark Days " this film portrayed the life of homeless people in new York city and how there appearance on the street would not link to their living quarters under the NYC train line. As I furthered through the project I continued to develop work and experiment with creating personality for my characters showing that the appearance on the outside is not all that matters and things can be totally different on the inside than out. Also to create a fun interactive piece for my final show would be key, as I like my work to have a satirical edge, creating a shooting gallery to portray how my characters are shot with and stamped in the social world of today with names and themes.


- - - - - - - - - - - - - - - - - - - - - - - - - - - - - - - - - - - - - - - - - - - - - - - - - - - - - - - - - - - - - - - - - - - - - - - - - - - - - - - - - - - - - - - - - - - - - - - - - - - - - - - - - -


Kathleen Hancox - Is Not Just A Fairy Tale

A lot of people think that fairy tales are for children and nearly always have a happy ending which isn't always the case in real life. This project is exploring links between fairy stories and reality and focusing on the darker side of the fairy stories which often have a dark comment on reality. One of the ideas that I listed was the story of Rapunzel where I made links with obsessive and addictive behaviour and the consequences. And another that I chose out of the list being Rumpelstiltskin where behind the character, rumple is a greedy and selfish character that slightly persuades the millers daughter to make deals with the hidden cost and with reality there are many ways where people have the similar traits, however the political party of whom we rely on to make our lives better all have strong links to these characters. So after listing and combining the characters and politicians I explored the links between Michael Gove and Rumpelstiltskin through samples that range from


combining costumes from programs and illustrations from rumple and styles of suits, to working with alternative materials such as wood.


During the 8 weeks I have come across problems such as no designers that fit my theme so I've had to look at designers and artists that have one section of the project and then combined it with a design or another artist to get the influences of both political and fairy tale. With me working with alternative materials I came across the frustration of the delicacy of the wood I chose to work with and having to change my design slightly to be fit with the flexibility of the medias that I have worked with.
Exploring the two styles I looked at a variety of artists ranging from paper artists, Artists and designers such as Helen Musselwhite who creates paper themes via layers of papers to Michael Landy who draws weeds and flowers and Vivian Westwood whom is a designer, using each other these artists you can see the clear link between my work and there


work o which has influenced me in different ways. Once I finished the Jacket that has both aspect of the project, I realised that I needed to do more to like with the political area so I heat pressed an article about Mike Gove and docking the teacher pay and used my Michael Land inspired drawing and laser cut a wallet and shoes. To link it in a different way I also made a scene of which Helen Musselwhite inspired me with which I made with brown card boar to keep the colours liking with each aspect of my exhibition.


When my exhibition was planned it originally had my garment bring hung up on see through wire but due to design fault, however when I had my group critique only one person suggested that but others said they couldn't find any faults and that they were impressed with how I made so many different aspect flow frequently together.


- - - - - - - - - - - - - - - - - - - - - - - - - - - - - - - - - - - - - - - - - - - - - - - - - - - - - - - - - - - - - - - - - - - - - - - - - - - - - - - - - - - - - - - - - - - - - - - - - - - - - - - - - -

Shaylagh Sexton - Reinvention

Many people have asked the question 'What is art?' and every artist has answered this in their own personal way. Some believe art should convey a social or political message whereas others believe it is purely about aesthetics. Personally, I feel that the best thing an artist can do is take an object that would normally be overlooked or discarded and release the potential it has to be beautiful. Marcel Duchamp first pushed the boundaries of the art world when he tried to submit a urinal into an art exhibition and was refused, and since many artists have used found objects in their work, particularly the Arte Povera movement which literally translates to mean 'poor art'.
All objects tell a story of their own and I am particularly inspired by objects that have been distorted, weathered and decayed in some way as I feel their rich history adds to the overall meaning of the work as well as the aesthetic appeal. It wasn't until I collected the objects used in my work that I was able to find the inspiration to work with them as I feel the objects themselves tell you how they should be displayed depending on their shape colour and size. For example all objects collected from the beach naturally seem to belong together due to the way they have been affected by the sea and the neutral colour palate of the drift wood and the rusting metals makes them work well as part of one piece of work. I was inspired by Robert Rauschenberg's idea of going on a journey and collecting materials to create his art, as like the objects I collected from the beach, this means the work speaks about the location it came from.
I hope that anyone who sees the work I have produced for my final project questions the way they perceive found objects. We are all so keen to produce materials, use them and then throw them away without second thought but when you take the time to look at something in a new light you might see the beauty in things that you would normally overlook.

- - - - - - - - - - - - - - - - - - - - - - - - - - - - - - - - - - - - - - - - - - - - - - - - - - - - - - - - - - - - - - - - - - - - - - - - - - - - - - - - - - - - - - - - - - - - - - - - - - - - - - - - - -

Lucy Moore - Family Portrait

To start my project based around portraits I created a series of Pastiches from artists such as Francis Bacon and Jenny Saville, this helped me as I picked up on different techniques they used and it also helped me practice getting the proportions right. In this stage I practised using different mediums such as paint, graphite, charcoal and also ink. After creating these pastiches in different ways I then moved on to creating paintings from my own pictures, I took pictures and then tried to recreate the portrait using ideas and techniques from my pastiches. I didn't think this worked very well as I didn't capture the emotion the way I wanted to and I also don't think I used the right colours, I should have followed the same colour scheme as artists such as Jenny Saville, Francis Bacon and Lucien Freud. When this didn't work I decided to look into Jenny Saville more in depth so I thought of ways I could create one of her pieces but in my own way so I looked at the way she painted on her own face which I thought was very effective.

To recreate this I painted on a student's face from my class with different coloured paints and then I photographed it, instead of doing drawings I decided I would do monoprints as it would be a little different and it would tie in nicely. After I had created a set of prints I thought about incorporating paint into them, instead of covering one completely in paint as I had done earlier I created one with hardly no paint and then build the rest adding more and more paint eachtime. After I had done this I documented it and I thought about how I could relate it to me personally, I came up with the idea of making it more family based so I took photos of my dad and sister and monoprinted them to A3 size, I did this twice and added paint to one and kept on just plain monoprint to show the difference between the two as one is more eye catching than the other one. In my exhibition I also included a pastiche of 'Bleach' by Jenny Saville which was created by everyone in my class; I feel this shows a link as I have a family at home and also a family in college. I feel like I could have included a lot more of my work in my exhibition but didn't have the sufficient space to include it all.

- - - - - - - - - - - - - - - - - - - - - - - - - - - - - - - - - - - - - - - - - - - - - - - - - - - - - - - - - - - - - - - - - - - - - - - - - - - - - - - - - - - - - - - - - - - - - - - - - - - - - - - - - -


Matthew Fearns - The Effects of Music

I decided to use the theme of "The Effects of Music" as music is something I'm interested in. I felt that this theme would give me a challenge because it has been done before; therefore it would be harder to come up with an original interpretation.
I started the project by researching artists that would link to my theme well and that would help inspire me like Wassily Kandinsky, Boris Pelcer, Miss Led, and Kathe Kollwitz. As well as these artists, I also researched the graphic design groups Tomato, Designers Republic, Onedotzero, and Airside because they all had a link to the music industry in one way or another, whether that was the members being in a band, or the company primarily producing work for music labels/bands/events. Although there styles were appealing, I felt that these styles wouldn't work well with what I was trying to do with this project. I was also recommended to research Bill Drummond and his book The 17. The theory that the book is about was interesting and made good points but I couldn't find a way of using it in my work.


When starting my work I found it hard to think of techniques that I could experiment with, but I eventually thought of some abstract ones. After using these techniques I eventually came up with the idea of showing the reactions people have to different songs. I felt like the best way to do this while linking to my researched artists was to ask them 3 questions for each song and then using the answers as inspiration for a large scale illustration to convey what they were thinking whilst listening to the song. In the end, I asked 5 people to listen to 3 songs at random off of a playlist I had made with a variety of songs from a range of different genres. I then photographed them whilst listening to each song, and then after each song I asked them whether they liked the song, how it made them feel, and what it made them think of. I then used the final answer as inspiration for the A2 drawings I made and paired them up with the best image from the photo-shoot for my exhibition. I originally wanted to have MP3 players playing the songs from the drawings, but because of complications I ended up using QR codes, I think this is better than using the MP3 players though.


In the end I am pleased with how the final pieces turned out and think I have linked to my research well and have shown what I have wanted to through my work. After having a group critique people have said they enjoy my work but have also made suggestions about what they think would made my work stronger. Unfortunately, I don't agree with what has been said or I am unable to make the changes they have suggested.


- - - - - - - - - - - - - - - - - - - - - - - - - - - - - - - - - - - - - - - - - - - - - - - - - - - - - - - - - - - - - - - - - - - - - - - - - - - - - - - - - - - - - - - - - - - - - - - - - - - - - - - - - -


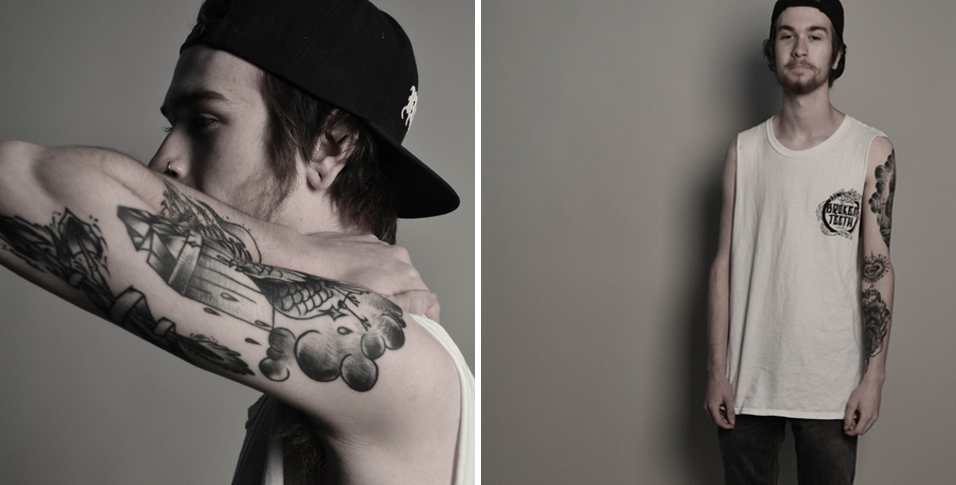
Rebecca Tyson - Meaning Over Beauty

My exhibition is based on tattoos and the meaning behind them and why people get tattoos for the aesthetic aspect. I started looking at different artists who produced documentary style photography, such as Serena Giovanna Stevenson. Her work showed the culture behind tattoos'. For example I researched the Moko and Yakuza styles. I looked at certain models such as Kat von D and Zombie boy who made a living off their tattoos which didn't have meaning behind them. The tattoos were just there for their own sake. Then I did a few photo shoots in the studio to explore the beauty side and then asked questions about the tattoo's to see whether they had meaning and the reasons to them. I started looking at places that have influenced people to get tattoos and the reasons behind it to which I documented in my journal.


I wanted to target different age groups so I photographed my step dad, as he has a tattoo of his dog. I asked him why he had it and he explained that it was like a child to him, this gave me the idea of creating a family tree. I based it on his family as they have a lot of tattoos that link to each other. The family members I looked at spanned across three generations. I explored different ways to lay this out because I didn't want a traditional family tree; I wanted one that I had designed myself. I wanted to include the beauty side of it so that it had some contrast and be simple and aesthetically pleasing. In laying out the final exhibition I used string to symbolise the connection and strength of the family bloodlines. On one side I wanted to make it look busy yet structured like a family can be. A contrast between chaos and order which I think sums up many families.


From doing the FMP one of the things I have discovered is that older generations have more life experience which enhances the beauty of their tattoos. Because their tattoos were less fashion driven their meaning is more important and more personal. Whereas people of a younger generation tend to see tattoos as fashion accessories. It has made me wonder how this will be seen in 10 years from now.


When doing the group crit I got some good feedback saying that I could have painted my frames. I did want to paint the frames but I was advised by my tutor that it would take the imperfections out and these imperfections better reflect the true nature of a family.


- - - - - - - - - - - - - - - - - - - - - - - - - - - - - - - - - - - - - - - - - - - - - - - - - - - - - - - - - - - - - - - - - - - - - - - - - - - - - - - - - - - - - - - - - - - - - - - - - - - - - - - - - -


Emilio Dean Lisboa - Within the Human

My original idea for my F.M.P was a metaphysical piece with an Atlantic theme much in the veins of Dali's 'Tuna Fishing'. Because I have an admiration for such stories as Moby Dick, The Old Man and the Sea and Homer's Odyssey I wanted to take the morels and themes of these tales and represent them through sublime allegories; mainly anatomy. I choose the concept of anatomy because it would have illustrated the story in a deeper and multi-layered perspective. Anatomy is a study of what's beneath; I wanted to go that direction in order to take my design skills to a more detailed and complex level that I never touched upon before; so my studies of the subject matter were quite intriguing.

For the past 2 months I not only looked at art for inspiration but areas of anatomy and science and how it has been used in art. I looked at Di Vinci's anatomy drawings, Michelangelo and Raymond Pettibon for style influence, but I also touched upon the art of Pollock and Turner to get a better understanding of


how represent atmosphere through expressive marks. However the product's style ascetics came from Vesalius' 'De Humani corporis fabrica libri septem' one of the earliest studies of the science of anatomy.


I managed to capture the book's vintage look into the early designs, but I also mixed in washes of ocean like colours to make the drawings look contemporary. As the product moved on I would conceive of different concepts and designs that combined elements of anatomy with Atlantic culture;one example is an article I did comparing coral with arteries. It seemed like the product was evolving; however changes were made to make the product more abstract.


Other than make the piece figurative I put more emphasis on the aspect of the circulatory system for a while. I would create a series of painting that weren't like I originally intended and for a while it was really out of my comfort zone. I even had to bring a


real pig's heart and a fish for reference; it seemed I was in a state of conflict, the original designs had potential and I didn't want to waste them. However I managed to those aspects and put them into each piece.


In conclusion though the final result wasn't what I first imagined from the beginning, as it is this series of paintings worked at being metaphysical. This F.M.P was to represent the journey and perspiration that man goes through to achieve his goal; I feel like that has been reflected in the progress of it all. The sketchbook, the research records the ambition I had and what I went through to achieve it. You can't always achieve your goals in life but there's always hope for you to achieve them; that's what I learnt on this experience. This course has shown me that whatever keeps me from making a product, I should keep moving forward along with the waves.


- - - - - - - - - - - - - - - - - - - - - - - - - - - - - - - - - - - - - - - - - - - - - - - - - - - - - - - - - - - - - - - - - - - - - - - - - - - - - - - - - - - - - - - - - - - - - - - - - - - - - - - - - -

Eleanor Barr - Perspectives

The concept of my Final Major Project is Perspectives. It was inspired by a piece seen in a Berlin Contemporary Art Gallery called 'The Flowering of the Rod' by artist Sara Barker. It was a metal installation placed on a wall and the shapes it was made of caused the overall view of it to change as you moved around it. As my interests are fashion and textiles, I wanted to take my interpretation of the piece and use the inspiration to create either a fashion outcome or textile art piece.
As I started the project I knew I wanted to experiment with sculpture and drawing, therefore I did not want to limit myself to a specific outcome. I just wanted to let my ideas flow into each other in order to produce a final outcome. In the end, my project went down the textile art route, however incorporated fashion techniques during construction such as print development and pattern cutting. The dress part of the outcome was inspired by the plastic sculpture behind it and the fashion label Paco Rabbane's Spring/Summer 2012 range of panelled dresses which were shaped around the form of a woman's body. I used the inspiration from these influences to create my own panelled dress which fits around the unique form of my own sculpture.


When planning my exhibition I chose to go with the idea of 'forced perspective' which is a photography technique I discovered during the research and development phase of final major project. As my final outcome developed into a textile art sculpture, my exhibition space became a lot more important as it was a chance to really show off my pieces in a way that re-inforces the theme of perspectives. By having it suspended by transparent beading thread, you are not able to see how the piece is supported, therefore adding to the illusion as there is nothing to distract the eye away from the piece.

Something I thought that would be really important in displaying my exhibition is the lighting. Because of the lines of the piece, I knew that the right lighting would cast interesting shadows onto the wall behind it, hence why I wanted to exhibit my work in this particular space. I was inspired to use lighting by Hussein Chalayan, a designer who created two separate dress collections using both lasers and LED lights. As you can see, even though the final outcome is not a traditional, wearable fashion outcome, there have still been huge influences from people and techniques within the fashion industry.

- - - - - - - - - - - - - - - - - - - - - - - - - - - - - - - - - - - - - - - - - - - - - - - - - - - - - - - - - - - - - - - - - - - - - - - - - - - - - - - - - - - - - - - - - - - - - - - - - - - - - - - - - -

David Cunliffe - Signs of Humour

For my work I looked at a range of artists for inspiration such as Clet Abraham, Roadsworth, Boris Bally etc. These artists gave me ideas to start my work. I wanted to change the way we look at road signs and to make people smile when they look at them.
I started off by printing off some road signs from the internet and I doodled over them. I then concentrated on a few different types of signs to see which two types worked the best and how many ideas I could do with them. I had chosen to use no entry signs and national speed limit signs because they worked the best. When I was happy with some of the designs, I painted them onto bigger scale signs I made to see how they would look on an actual size scale. I was very happy with the outcomes they created.


I decided to then look at other ways of creating my signs of humour and came up with making a life size no entry sign. I looked at this approach to show a wider range of funny poses. I first created the background by painting a giant red circle onto my workspace wall and asked a fellow student to try on the black morph suit and hold up a white board, which I had cut out, so they became the stickman in my designs. I asked the model to do some poses using the white board, which I photographed; this gave me another successful way of showing how signs can be funny. I think this idea created a completely different view on road signs and turned them from 2d to 3d which made them even funnier as the poses were limitless.


For my FMP I have used the life size no entry sign and stickman idea and made a video with it. I made this video by asking five fellow students to model the morph suit and each doing a different moving pose while being filmed. When I had made the video I had to edit it using adobe premier. I had to speed up the video so it could be shortened, while still being able to show all the models and their poses in enough time. Once I was happy with the video, I inserted some background music (The Benny Hill Theme Song) to emphasise the funny poses the models had created. I am very pleased with how the video turned out and I think it concludes my project very well and in a comical way which is the mood I wanted to create. I decided to make the video to emphasise to people how we look at signs on a day to day basis and think of the possibilities that can be added to them to completely change them from being boring and 2d into fun, funny and unique using a 3d approach.


- - - - - - - - - - - - - - - - - - - - - - - - - - - - - - - - - - - - - - - - - - - - - - - - - - - - - - - - - - - - - - - - - - - - - - - - - - - - - - - - - - - - - - - - - - - - - - - - - - - - - - - - - -

Kate Morris - Art Pop

In the FMP I wanted to look at a specific spring 2014 trend called ART POP. I found this trend on Style.com and it is basically collections that are inspired or have some sort of connection with art.


Within the first few weeks of the project I was struggling to come up with inspiration for a collection, I had looked at a number of high end designers and also the pieces of art that inspired those particular collections. I couldn't find any artists to inspire me in my own work so I started to look at the actual collections themselves to find inspiration.
I ended up looking at the techniques and the fabrics that designers used; I then chose the technique of using the heat press machine in the majority of my designs. I used the standard patterns from college and then altered them to my own style, for example I made the sleeves lower and longer in one design, and the dress shorter in another design. I sourced most of my own fabric from Abakhan in Manchester and also TP textiles in Warrington, I also was given some from college. The heat press was the main focus in my designs and it is what linked them all together, I decided to use leafs and plants to create the patterns, the plants did smell a lot when I heat pressed them and sometimes the liquids from the plants transferred onto my actual designs. I made the necklines all the same shape in my three designs and the sleeves similar so that the designs linked to each other and matched.


My 'couture' statement garment was the easiest to make because I didn't use a pattern for it, I simply used a thick material and put it round the neckline and then attached a skirt to it later on. I used live plants for this design because I think it was a lot more effective that using fake leafs, I simply used a glue gun to attach the leafs all together, I am nervous to see how the design will look just before the exhibition showcase and how much it has withered.
Setting up my exhibition wasn't too difficult because I didn't have too much to do, I decided to use a long stick to have my designs hanging down from, I used fishing wire to make it hover from the roof because it wasn't too detectable, I then decided to use 3D hanging mannequins to display my pieces because normal hangers made them look flat and lifeless, I then used a standing mannequin to display my 'couture' piece so that people will understand that that is the focal design.


On the whole I thoroughly have enjoyed my time throughout Art Foundation and have learnt so much, I think that it has made me so much more confident about my decision to go to university. I think that all tutorials have been effective and tutors have been as helpful as they can be.


- - - - - - - - - - - - - - - - - - - - - - - - - - - - - - - - - - - - - - - - - - - - - - - - - - - - - - - - - - - - - - - - - - - - - - - - - - - - - - - - - - - - - - - - - - - - - - - - - - - - - - - - - -

Azaria Wright - The Artistic Interpretations Of Growth Through Natural Forms In Structures

When I first started the project, the goal was to create a piece of work which engages and excites people while showing the development of growth through sculpture. Throughout this project, I have explored various artists that have influenced my work; David Nash in particular.
To start off I looked at all the different types of visible growth in natural forms and looked through a book called 'raw materials' which led me to look at artists such as Zadok- Ben David and Jai-Hyo Lee. These began to make me look at different materials and I started carving animal forms from dry clay. Because of the dust it was essential for me to wear protective gear, but after a week or so I began experimenting with plaster, and colouring plaster. The different colours and textures I was getting reminded me of geodes and minerals and I really enjoyed emulating rocks with plaster.


Another week or two past and I realised that I needed to go in a different direction, that's when I started looking at the works of David Nash. I loved the way his sculptures were so raw and simple; yet made a big impact. I started creating my own wooden experiments, making sure I didn't stray too far away from my initial title, focusing on growth. I made lots of sculptures focusing on dissembling and reassembling branches in order of their growth. After various pieces and group crits which mainly told me that I needed to 'work on a bigger scale'. With help from my tutor I sourced some much larger tree sections to sculpt with, and I went to Liverpool and made some final sculptures on site. These sculptures were a culmination of all the smaller ones that id done, there were a lot of health and safety issues involved which I had to overcome, especially working with power tools, but I was really happy with the finished sculptures. When it came to my exhibition though I didn't feel like the final sculptures that I made were enough, so I put in 2 of my development pieces to show the growth and development.


I'm really happy with my exhibition, I feel like I've definitely achieved my goal, and feedback I've received from my group critique fully supports that. If I were to repeat this project, I would focus more on developing work from different artists rather than developing from a select few. Also I would plan my time more efficiently, and write about my work in greater depth throughout my sketchbook.

- - - - - - - - - - - - - - - - - - - - - - - - - - - - - - - - - - - - - - - - - - - - - - - - - - - - - - - - - - - - - - - - - - - - - - - - - - - - - - - - - - - - - - - - - - - - - - - - - - - - - - - - - -

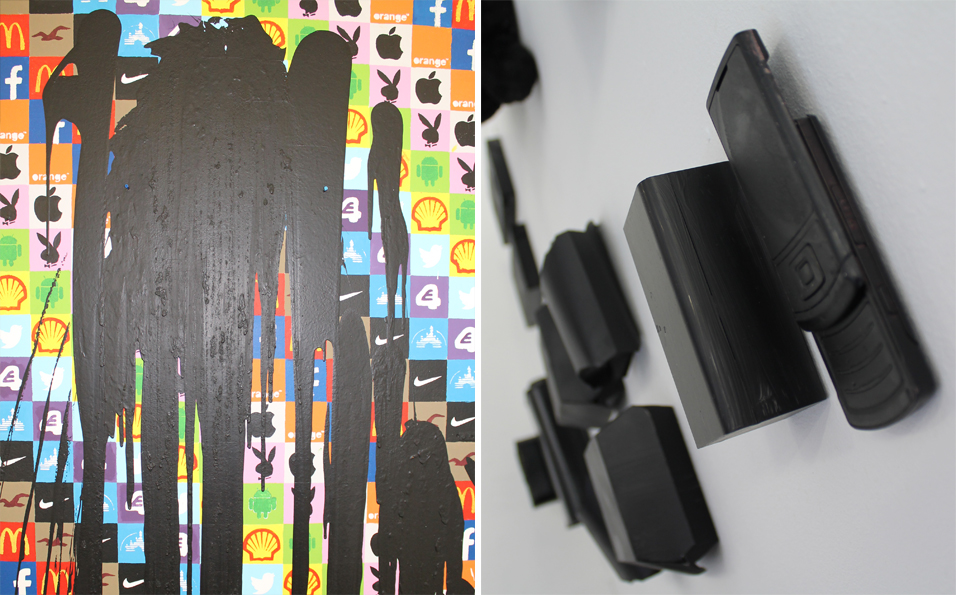
Katie Whitely - Consumerism

During this project I've been looking into advertising and how the subconscious is affected by advertising of brands and how we as consumers are sucked into the brands imagery they create. I researched the sub consciousness with memory games at the beginning of the project to get an insight of how people react to memorising different brands, some more successful than others. This was useful and helped me understand how people saw the brands that I ended up painting and including in my final pieces. More research included looking at the phycology of colours which lead me to developing my use of colours in the logos. I felt that this was a successful path of development and I would have liked to take it further and develop more if given the chance again. For my final pieces I feel that they have all tied in well together representing the branding theme via film, 3D objects and 2D painting.


I do feel that I could have improved my film more if given the time which I could have had if I had managed my time more. I could have experimented more with the film and made it more complicated however I felt that I wasn't capable of making a complicated film look professional enough. With my 3D piece of my exhibition, it didn't go as planned as I was unable to collect enough objects to completely cover the wall, and so I went with my second plan and chose a select few items and displayed them orderly to represent the brands on the opposing wall.


Overall I think that this project has been successful, I would have liked it to link more with my intended title of the project however my work developed more into the subversion of brands as opposed to the subconscious effect of the brands however I'm still happy with my outcome.

- - - - - - - - - - - - - - - - - - - - - - - - - - - - - - - - - - - - - - - - - - - - - - - - - - - - - - - - - - - - - - - - - - - - - - - - - - - - - - - - - - - - - - - - - - - - - - - - - - - - - - - - - -

Emily Jones - Identity Through Perception

My final major project is all about 'Identity through Perception'; this involved exploring an open theme of a person's identity, and the ideology behind perception. I have always wanted to use my huge collection of family photos and so I investigated traditional and digital methods to create a variety of manipulations. My initial starting points began by taking strong influence from illustration artists including Montana Forbes and Julian Opie; this lead me into doing simple, flat line drawings from the original photographs, as well as Photoshop manipulations making the people look more characterised. Most of my illustrative pieces developed from hand drawn pieces, to digitally Photoshop images. In order to experiment with the identity of the persons in the image, I experimented by removing their faces (as through my psychological research, I found that facial recognition was the main element into identifying a person). In response to looking at Claude Heath, I completed some continuous line drawings; these were then layered onto its original photograph, in the style of Picasso's light drawings. These layers influenced me, to develop the structure of layering pieces together, and so I completed a 'Dear Photography' task; for this I collected a selection of photographs (which dated back to 1991) and I took them back to its original setting where it was taken.


The idea was to capture the photo again, by holding the photo and lining it up with the background as a new layer. The identities in the photos were obviously personal to me, and so I decided to look deeper into the route of the images; where the photos were taken. There were three main locations and so I created a map based on areas from the three, so that all of my imagery could link back to its route in a simplified way. Because of the detail in the maps, I decided to draw just the main roads, so that details didn't distract my images in my exhibition. Because I had the intention on using typography to label or identify the people in the photos, I questioned others about their perception of my family; this provided me with a range of objects. In order to subtly identify each person without giving too much information, I engraved small tags with an object on one side, and a matching date of birth on the other; the audience of my exhibition will perceive my work individually. The grid formats of my imagery was suggested by peers in a group critique midway through the project, and in the final group critique that took place, all the main ideology and elements I had made effort to portray in the final outcomes, were recognised.


- - - - - - - - - - - - - - - - - - - - - - - - - - - - - - - - - - - - - - - - - - - - - - - - - - - - - - - - - - - - - - - - - - - - - - - - - - - - - - - - - - - - - - - - - - - - - - - - - - - - - - - - - -

Claudia Reed - Imaginary Worlds

For my FMP I called my project 'Imaginary Worlds' exploring the themes of utopia's and underworlds through questionnaires which were then created into illustrations. I explored four utopia's each with a specific person in mind, Lauren, Feilix, Mum and Sarah. Each piece was constructed with symbolic images, signs and symbols that are unique to each person. Each made from secondary sourced images to create inspired collages like illustrator Matt Maitland who created mixed collages. The main layout of the exhibition has been inspired from my pathway stage where I used same skills and techniques. It has been one of the main influences in my final exhibition. They gave my work a more subtle and professional look. During the first weeks of the project I found that the utopia experiments were not at the high quality I wanted them achieve. This made me rethink my plan and I decided just to develop and finalise the utopia illustrations instead.


The intentions at the start of the project were to have abstract drawn illustrations each with their own personal imagery which clearly showed each person's unique interpretations of utopia and underworld. This then changed to become digital only utopias. The feedback given from each interviewee has been the main influences towards each illustration. For Feilix's illustration I wasn't able to receive this feedback due to her own commitments so I therefore wasn't able to develop her pieces and just used my first collage as her final piece. All of the collage illustrations have been created using the digital software Photoshop cutting and crop images. Once I had finalised them I then used cell-o-tape on top of each image which was then rubbed away with water to create a transparent effect to each. It was my most successful experiment through both FMP and pathway project. The text behind each, are each interviewee's handwriting from the questionnaires. I wanted to make each illustration personal to them so they didn't look too familiar to each other. I also decided in the middle of the project I would create character designs inspired by the illustrator Peony Yip who creates pencil portrait and animal overlays. I thought that this linked well with my concept as it would break down my collages and show the audience the personality of that interviewee. This would give you a deeper insight into that person. I asked each which animal represented them, received almost similar animals like lion and domestic cat. These were then drawn in pencils and printed on acetate like my pathway stage.


At the end of this project the whole art foundation course did group critiques about all of our final exhibitions. Their thoughts were that the way I had placed my overall collages against the window to allow natural light through almost reminded them of a stained glass window. This is the effect I wanted to achieve as my perceptions of stained glass windows are churches which are calm, spiritual and peaceful. Some of the key words which my interviewee's had used.

- - - - - - - - - - - - - - - - - - - - - - - - - - - - - - - - - - - - - - - - - - - - - - - - - - - - - - - - - - - - - - - - - - - - - - - - - - - - - - - - - - - - - - - - - - - - - - - - - - - - - - - - - -


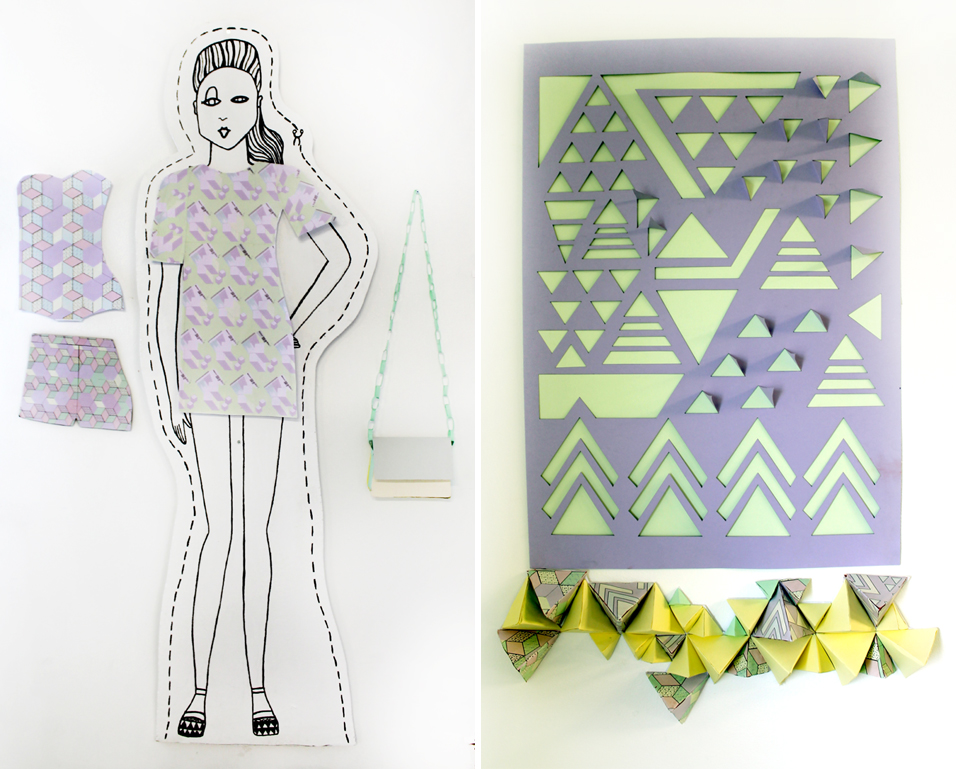
Katherine Hughes - Future Trend

The concept and initial idea for my FMP, was to reflect a future trend through the use of paper. I chose this as my focus, as I'm always intrigued by various window displays and the ideas behind them. I also took an interest towards the idea of exploring the effects of visual merchandising and how certain looks/trends can be portrayed by a store, to capture the attention of its target audience. Whilst researching into a wide range of window displays by brands from around the world, I noticed that many presented their products through a narrative. Linking to the trend, almost like a scene from a story. Because of this, I decided that I would base my idea on creating a display which reflected my chosen trend, but also included some form of narrative which I think my target audience may relate to.
After researching into trends for s/s 15, I decided that I would focus on a geometric theme. After deciding on my chosen trend, I began to photograph and analyse various window displays around


Liverpool, taking in the different strategies that had been used to present a certain theme/trend. I then as a starting point began to experiment, by drawing a range of geometric forms. I then began photographing certain areas in college and around other places, where geometric shapes were present. From this I was able to begin collaging and experimenting with my ideas by putting them into Photoshop to create different patterns.


Whilst exploring various techniques and shapes that I could create using paper, I discovered the use of paper dolls within window displays and how they can be put together to reflect a product/trend. I also began researching wall art pieces as I felt intrigued by the idea of having a 3d effect within my display. I looked to artists' works such as Romain Lenancker, Abigail Reynolds and Sarah Louise Matthews, for inspiration. Using this, I began to experiment with different 3d shapes through the use of paper, along with laser cutting which I created patterns for based on my photographed shapes.


After deciding on a paper doll theme, I began researching into brands which I felt were suited to my theme and target audience. I decided on forever 21, as they feature the latest trends and many of their collections are aimed towards a young female audience. Due to my trend being forecasted for s/s, I decided that the concept of my display would also surround a holiday theme, going from 'day to night'. I then began researching into holiday wear and looked at street styles from abroad, which helped me decide what style of clothing I would include. I also experimented with different types of illustration to see which look I would use to create the doll, which would feature in my display. After deciding on which one I would include, I then used a projector so that I could draw my design onto wood. Once my design had been transferred, I added my final garments to the doll, along with accessories that I had created.

- - - - - - - - - - - - - - - - - - - - - - - - - - - - - - - - - - - - - - - - - - - - - - - - - - - - - - - - - - - - - - - - - - - - - - - - - - - - - - - - - - - - - - - - - - - - - - - - - - - - - - - - - -

Lucy Davies - Dysmorphic

For my project I looked at Dysmorphic body image and eating disorders. I wanted to explore the dysmorphic reflection people see when they are sufferers of disorders like Anorexia Nervosa. I wanted to link it, in a way, to the 'Project 10'. In that project I looked at crime, mainly that we commit against other people, in this project I wanted to look more at crimes we commit against ourselves by not liking ourselves, dieting and having an unhealthy diet.


I started by looking at Jenny Saville and how she presses larger women against glass to distort their bodies and possibly make them look larger and more unattractive. I think this helped me in exploring the way women see their bodies as they usually see themselves as larger than they are.
I also looked at Gil Zamoras work with Dove as that also shows how women see themselves as less attractive than they actually are.
I watched a few documentaries to learn more about how eating disorders like anorexia take over a persons mind and how young that person could be. The first one I watched was ' Dana, the 9 year old anorexic' this follows a 9 year old who suffers from Anorexia Nervosa and her journey as an inpatient at Rhodes Farm clinic. I also watched:
- I'm a child anorexic
- I'm a boy anorexic
- Super Skinny me: The Race to Size Zero
- Dying to be Anorexic
These documentaries really helped me to see inside the daily life of an anorexic person which really helped me toward my final project. This is what inspired the mirror and the clock. The clock was made to show the routine and repetitive cycle anorexics have and the mirror to show the dysmorphic image they see.


The only problem I encountered was while I was making my project was making the mirror, I struggled to make it have that distorted look because when I stuck the mirror onto wood the mirror would be flat and not distort much. I decided instead of sticking it to something to just have a piece within a frame so it looked looser and more distorted.
In my exhibition I have my 2 mannequins, my clock, a stethoscope, my spine stretched material and my mirror, I think these were the best items to use to show the medical and dysmorphic side to Anorexia Nervosa.
Overall, I think the project was successful in showing what I intended to show, the medical side was displayed with statistics and the stethoscope and the dysmorphia and desire to be underweight was shown with all the other pieces I did like the mannequins for size and spine for dysmorphia.

- - - - - - - - - - - - - - - - - - - - - - - - - - - - - - - - - - - - - - - - - - - - - - - - - - - - - - - - - - - - - - - - - - - - - - - - - - - - - - - - - - - - - - - - - - - - - - - - - - - - - - - - - -

Jessica Lynsky - Beauty Indistruction

My concept of Beauty in destruction has let me use a variety of techniques and materials within my work to look at whether destruction can be used as a form of creating artwork. Through a lot of experimentation within my project I have decided to do a series of statues and look at different ways of destroying them and seeing if they can still hold up as pieces of artwork within my exhibition. I chose the starting point of the Venus de milo as it links into the art history theme throughout my work as it is what I want to continue to do at university.


My initial statues were made of plaster as it is an easy material to use with moulds and is commonly used with copies of famous/ old statues. I had real problems with getting the plaster sculpture out of the mould whole, So had to think of ways to reconstruct the pieces of the statue as the only way to get it out whole was to cut open the mould and that would mean I wouldn't be able to use it again. In the end I decided to use filler, after lots of trial and error using glue, plaster, etc. Although this worked really well, the statues are still delicate and need to be handled with care. With The various plaster Venus de Milos I made I used different techniques to destroy them. The first was graffiti, which I got the idea while doing a peer critique with one of my classmates. I used one of the statues that I had reconstructed as I wanted a perfect base for the design to go on top of. At first I wanted to use marker pens to create the graffiti and leave it in the art room and let other people draw on the statue, to make the graffiti as authentic as possible, but the marker pens didn't work well on the plaster and I even tried using paint and varnish to give a smoother surface that wouldn't dry out the pen but although they helped it still didn't give the effect I wanted to give. So I decided to use spray paint, which although wouldn't be able to produce the detail that the marker pens would, the overall effect was a lot more abstract and authentic. While using the spray paint I had to make sure that I was in a well-ventilated area so I didn't affect anyone with asthma or any other breathing difficulties.
The second plaster sculpture was the drill sculpture. This one had no planning and was more of a spur of the moment technique after one of my other ideas failed. I actually really like this one as it shows how long it took for the plaster to dry as you can see the wet plaster that was on the inside. I think the texture and effect that the drill gave is really interesting to look at and really takes the destruction element of my project literally.
My third sculpture is the ice sculpture, which I'd had since the beginning of the project. I'd wanted a sculpture that was more literal, so that the people at my exhibition could see the destruction process instead of just the final result. The hardest part of this sculpture was working out a way where I could freeze the water without it spilling as the mould is made of latex and can't hold itself up. In the end I used the chest freezer in my garage and duct taped it to two of the shelves. This worked well and I have kept it in my freezer so I can bring it to the exhibition on the night of the show.


The next sculpture was the burning one. I'd had the idea of burning a statue for a while in my project and after a talk with one of my tutors about setting fire to all my work, it solidified my idea. Although burning all my work would be pretty much impossible, I still liked the idea of using fire, so I used another one of my reconstructed statues and took it to the heat room to use the blow torch on it. While using the blow torch I made sure that I wore the proper safety gear such as a leather apron, gloves and helmet to protect my eyes and face. I also made sure I concentrated while using the flame and kept it pointed away from myself and anyone else that was present. I really like the way the fire effected the plaster and how the time I took in each spot changed the way it burnt the plaster. At first it charred it, creating darker patches, but if I concentrated the flame onto a spot for a longer amount of time it created a crackled effect where the plaster had broken apart. This statue is my favourite because of the simplicity and the detail it gives.


My next sculpture I used one of the plaster statues that I hadn't reconstructed, I felt it was pointless as it was going to be broken up again straight afterwards. As I wanted the pieces to be broken up as naturally as possible I decided to throw it off a high place. I decided on the fire escape as it was on the second floor but outside so I wouldn't get in the way of any classes. Plus it had a railing to keep me from falling off. When I was throwing the pieces of statue I made sure there was no one around so I wouldn't hit them with the pieces. Once I had finished throwing them, some of the pieces still seemed a bit large, so I hit them against the corner of a building, this also gave them better textures and more interesting angles.


I used wax for the next sculpture as I had liked the idea of using wax at the beginning of my project for my bust idea. I think is the perfect material for my project as when wax melts it creates beautiful droplets that hang off the figure. In my experiments with the smaller David statues I had tried to use a lighter to melt the figures but because it took so long I was going through to many lighters and needed another way of melting. I decided on the heat gun that I then used on the Venus de milo, it is a lot quicker but because of the intensity of the heat the wax stays melted longer and doesn't form the droplets that I wanted. So after melting the statue a sufficient amount, I went back in with the lighter to add droplets on top of the already melted statue. I think this technique turned out best as it is quick and still provided the results I wanted.


For this sculpture I also used a plaster figure that I hadn't reconstructed as It was going to be made into smaller pieces anyway. I wanted the form of the Venus de milo to be unrecognisable so I wanted it to just be a pile of plaster. At first I was going to just use the plaster powder and only use the amount I would of made used to make the statue, but I that wouldn't have been destruction. So instead I decided to shave of the statues using a craft knife to get flakes instead of powder. I had to be careful using the craft knife as I could cut myself so I made sure to always point it away from me as I was shaving the plaster and made sure I kept the blade away from my fingers. I actually prefer how it came out as it shows more of the destruction than the powder would have and also the flakes are interesting to look at.
In the second to last statue I used one of the reconstructed plaster statues again. This time I wanted to keep the shape of the statue and instead effect the colour. This was inspired by the clay bust I had made of myself and then poured plaster and concrete on top of as I really like the effect it gave and the drip marks it created. I liked the idea of pouring/ spilling something onto the statue as commonly when you spill something on your artwork it means you have ruined it. In this case however I really like the contrast of the black and white, I used bitumen as it was the blackest thing I could think of without being as thick as paint as I didn't want to affect the shape or form of the statue in anyway and I think with paint I would of lost some of the detail.


The last statue I did was using string and wood. I had seen a bust of David in my research by Eduardo Paolozzi that had been cut into pieces and reconstructed using only string and wooden blocks. I really liked the aesthetic that it gave and the challenge it presented. Using one of the reconstructed statues I had the figure cut on the bandsaw by Ste into sections that I could then reconstruct. Ste also cut me some small wooden blocks that I then used to wedge between the pieces of sculpture. This was the hardest statue to construct as to get it balanced was difficult. I started off using a very thin string that I repeatedly wrapped around the figure to give it strength but this ended up looking messy. So instead I used some thicker string that I wrapped around each part only once but knotted it tightly to hold it securely in place. The wooden blocks really helped with this as by wedging them in between pieces helped tighten the string keeping it secure. Although it was the hardest to make, this sculpture has gotten the most compliments out of all the rest.


As a whole I am really happy with my final piece, I have gotten to work with a variety of materials and techniques that I have really enjoyed and helped me further my abilities and skills. I think the series of sculptures shows that I have thoroughly explored my concept of beauty in destruction and have produced outcomes to a high level that I am proud to have in my exhibition.

- - - - - - - - - - - - - - - - - - - - - - - - - - - - - - - - - - - - - - - - - - - - - - - - - - - - - - - - - - - - - - - - - - - - - - - - - - - - - - - - - - - - - - - - - - - - - - - - - - - - - - - - - -

Stephanie Warbrick - Elegance and Indulgence – Rolling Deco

The concept of my final major project was Elegance and Indulgence from looking in to the Rolling Deco showcasing the most stunning rides from the 1920s to 30s. Using photographs of rides from the Gatsby era, I developed stylised fashion illustrations by cutting up and collaging the shapes within the bodywork of the cars to produce designs with sleek innovative shapes reflecting the simplistic art deco age.


Creating my final outcome, I wanted to work with unconventional materials as I wanted to reflect on the materials of the 1920/30s cars, after an unsuccessful gathering of car parts I chose to act on the concept by using metal wire. After experimenting with manipulating wire to produce a structure resembling shapes from my designs, I had to make sure each join attached securely which therefore ended up being very time consuming. I was pleased with how the base structure ended up but following my designs, to have parts covered, I used adhesive backed PVC vinyl, which when heat added to it, can be reprocessed and manipulated over the frame. Linking back to the concept to making a metal work look, I was able to achieve this through the high gloss finish which the PVC creates.
When producing my final design, I felt that the fashion design element was missing so I came to the conclusion to make a fitted body design element within the structure in addition to using a mannequin. To make it in keeping with the art deco theme, I used copper mesh as the colour suited well and happened to be a good media for moulding around a body. Creating the body was very tricky as I found the method of wrapping each wire piece on the edges around the copper wire took a lot of time but resulted in a clean tidy edge.


When presenting my final outcomes, after having to create the structure against a wooden frame I knew I would have to exhibit it attached to a frame so in keeping with my art deco theme, created a frame in the style found within the zig zag art deco patterns.
Originally my idea was to have the wire mesh body inside the wire framed structure to show depth within the design and to also convey the fashion design aspect making it look more like an unwearable garment other than an art piece, but when coming to achieve this I found out that it didn't merge aswell as designed and confused the eye taking it away from looking at all the details individually, therefore I came to the conclusion to showcase both of my final creations separately, with just the thought aspect of the structure being moulded around the mesh body without it being shown literally.

- - - - - - - - - - - - - - - - - - - - - - - - - - - - - - - - - - - - - - - - - - - - - - - - - - - - - - - - - - - - - - - - - - - - - - - - - - - - - - - - - - - - - - - - - - - - - - - - - - - - - - - - - -

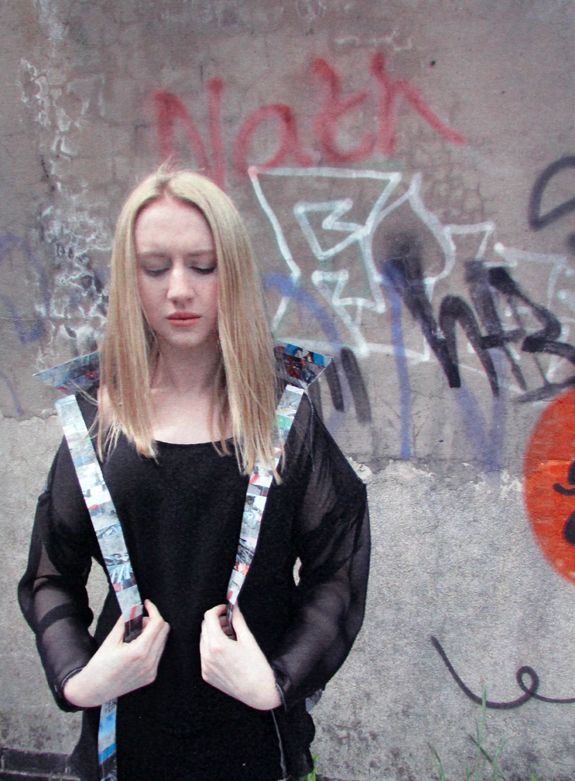
Megan Frith - Berlin Branding

The concept of my FMP was to convey my opinion of Berlin from my recent study trip to the city. I felt it was important to demonstrate the artistic energy and creativity of the culture of today as well as contrasting the dull atmospheric run down surroundings with the historic Berlin Wall which is a significant part to the city. Modebuch Berlin Fashion Book which I purchased while in Berlin has formed an importance of my concepts and interests throughout my journey.


Throughout the project my intention was to create a ready to wear collection with a contemporary art influence. To summarise Berlin Branding I designed and made a garment representing one for each section research; Berlin Wall, young culture of today and a linking piece of clothing. The plastered kimono symbolises the Berlin Wall as the plaster reflects a similar texture and the base colour blue shows the effect of the graffiti which lies on the remaining ruins today. Juliaheuse the Berlin fashion designer is who helped me to develop this idea by creating textured surfaces. Secondly the paper shirt conveys linking of the old and new of Berlin, both dull and bright colours mixed from my primary source images. Raphael Hauber another designer from Berlin is my inspiration for this piece as the technique came from my response from his style of work. Finally the colour garment signifies the mix and match style of fashion also the colourful street art which covers the city. It is my way of showing how their clothing is often bold, bright and quirky from viscose material. I chose to create quite baggy oversized garments as the style came across in Berlin therefore all clothing patterns were made by myself. Working with new material and techniques was my focus for this project and I feel I definitely achieved that through many influences and development stages.

- - - - - - - - - - - - - - - - - - - - - - - - - - - - - - - - - - - - - - - - - - - - - - - - - - - - - - - - - - - - - - - - - - - - - - - - - - - - - - - - - - - - - - - - - - - - - - - - - - - - - - - - - -

James Proctor - Psychology of Phobias

For my final major project, I decided to create several pieces of abstract artwork demonstrating different psychological concepts (such as fear) that frequently appear in various media; these works were created using various physical media and Unity, a program normally used for game design. This challenged my creativity somewhat, as I was required to combine several concepts that I have never intentionally used together before, and the artwork I created had to portray and represent one specific psychological concept, as opposed to the multiple concepts that would be seen throughout everyday life or used together in other artwork.
This project theme was partly inspired by my personal interest in psychology, and partly by my various art-related education and hobbies; because of this, I was able to create several varied pieces of artwork that were original and unusual, while still maintaining an underlying sense of structure.
While creating my final outcome I used a variety of physical materials, as mentioned above; the reasons for this variety were twofold, firstly, it allowed me to obtain a lot of experience with a variety of media that I have rarely used before, secondly, the wide range of techniques I used to create the numerous structures that make up my final pieces of artwork, in addition to the variety among the materials themselves, results in a diverse range of pieces with a variety of different themes.
I also chose to create the maze artwork using Unity, as it enabled me to create an interactive, navigable 3D environment, allowing the audience to interact with it and experience some difficulty while attempting to do so. The maze functions as a metaphor for censorship, with the difficulty traversing it paralleling the challenge one may face while attempting to work their way past actual censorship and other similar restrictions.
I created my various word-themed artworks by sculpting a word associated with a certain fear (fall being related to the fear of heights, drift being related to the fear of water etc.) and placing it in a situation associated with said fear; "fall", for example, was thrown from a building and photographed before after and during the fall. This concept was chosen as, due to the wide variety of fears with multiple potential visual portrayals, the theme had a wide variety of potential applications.
I feel that this project went well, however, if I were to do it again, I would invest a significant amount of effort into managing my time better as, though the process of creating my artwork went well, it felt rushed at certain times, as I had elapsed too much time beforehand. I would also ensure that I kept up with the research concerning the various artists that inspired my work, as that also fell a little behind schedule.
Overall, this project was quite enjoyable as it allowed me a large amount of creative freedom while also allowing me to expand my skills with various physical artistic media.

- - - - - - - - - - - - - - - - - - - - - - - - - - - - - - - - - - - - - - - - - - - - - - - - - - - - - - - - - - - - - - - - - - - - - - - - - - - - - - - - - - - - - - - - - - - - - - - - - - - - - - - - - -

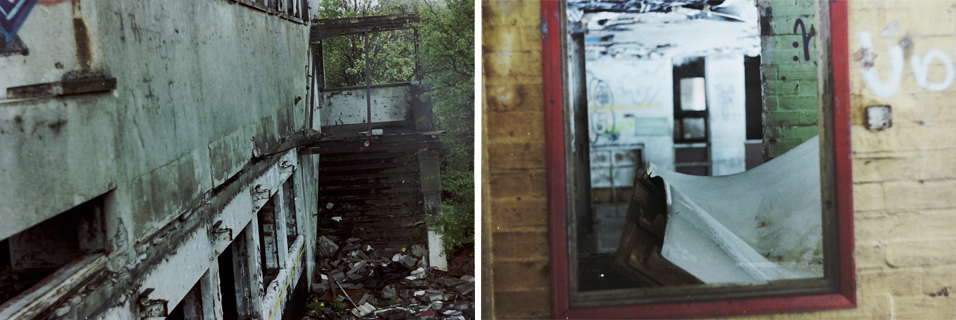
Lauren Brown - sticks

In my FMP I wanted to focus on Interiors and Exteriors as individual elements and then work towards linking them together and creating opposites.


My main pieces of work that I initially planned to exhibit was the indoor tree branches that give the impression they are growing through the walls and floor and the table and chair which are exhibited outdoors which have allowed me to think of other pieces of work that will echo the concept of my work where I am bringing both interiors and exteriors together. Primarily the branches and table and chair are just opposites but I have since gone on to create a wallpaper design wrapped tree, a yarn bombed tree and a painted tree stump which show the opposites of indoors and outdoors but which are incorporated together, for example, wallpaper is designed to be hung on internal walls as a decoration but I have taken it and shown it on a tree outdoors, showing the contrast in colours between nature and man-made. The wallpaper design I made for the tree is one of six final outcomes which I made from prints of twigs, using inks and then Adobe Photoshop to layer, rotate, dissolve and repeat the design and this has brought the process of tree, to twig, to print, to Photoshop, to paper, back to tree in a circle, thinking of the process of how paper is made and over time the paper will tear and rip from nature and eventually turn to nothing but some soggy scruffy bits of paper and I like how time comes into my project as well, with the prints and also with the table and chair because that was initially put there to show how nature can take over and over the whole project, around 10 weeks, the grass has grown, the furniture was moved and it's all about the documentation which brings the piece together.


Around half way through my FMP I visited Yorkshire Sculpture Park which was recommended to me just to look at the types of works that artists have created to be shown outdoors and also to visit Andy Golsworthy's piece of work, Hanging Trees which inspired me to create the interior branches outcome. I had an idea to make a sort of pathway or journey which linked my two main outcomes together but since looking at the map I brought back from YSP it seemed like a better idea to make it more or a spread out journey than something that was so methodical and I never planned that my project would be based on the visit I made but I think it has finalised my pieces of work better than my original idea.


As you visit each outcome through my journey you will see more clearly how both interiors and exteriors have been brought together as one.

- - - - - - - - - - - - - - - - - - - - - - - - - - - - - - - - - - - - - - - - - - - - - - - - - - - - - - - - - - - - - - - - - - - - - - - - - - - - - - - - - - - - - - - - - - - - - - - - - - - - - - - - - -

Natalie Hassall - Objects of Fashion

The view on today's woman figure is that 'every woman can be a super woman; a streamlined super-feminine warrior, landed from outer-space' – Fashion Zeitgeist, Trends and cycles in the fashion system page 89. The same cannot have been said in the 1870's: 'The affluence of the man, understated in charcoal grey cloth is all the more impressive thanks to the jewel at his side' – Jean Béraud – 1878. Reading Fashion Zeitgeist – Trends and cycles in the fashion system at the beginning of my project kick-started what is now the foundations of my Final major project; a show that collaborates how fashion was seen in previous years in comparison to now, with the twist of delivering the concept through a pop-up catwalk. I looked back into the pathway stages of the course, specifically project 10 and my extended project where I used techniques such as promoting and adapting t-shirts as well as creating my own t-shirts which stretched my knowledge and abilities, ultimately developing my concepts and making skills, getting me ready for university standard.
Throughout the project I have looked into; pop-up catwalks and shops, roles in relationships, women figures, flash mobs, adapting normal things into 'jewels', conjoining clothing, questionnaires with couples and performance art, eventually leading me up to a final pop-up catwalk. I promoted my catwalk through various methods including social media and subliminal advertising around the college.
During the project I have altered two t-shirts to connect to each other much inspired my Lucy Orta's work as well as adapting an ordinary t-shirt into a 'jewelled' garment to show the idea of having a jewel stood out amongst the other mundane t-shirts. With these and my final garments, I organised photo-shoots to show them being worn. Alongside these t-shirts I also organised two pop-up catwalks: one asking random people to walk down my red carpet in Liverpool town centre and the other in college where students strutted their stuff down it subconsciously as I took their photos. To show the idea of the jewel fading away as time goes by, I made series of overlaid images of two couples both wearing my final t-shirts that are the same t-shirt made with four different materials ranging from canvas, which represents now as women don't need to wear jewels to be a seen as a jewel, to duchess satin, representing the 1870's and how women were seen as an object of the man's wealth.
For my final outcome, I got five students to be models; four females to wear my t-shirts and one male to be the man in charcoal grey to take the woman in order of fabric wealth down the catwalk, breaking away slightly each time to show the transition of women nowadays compared to the 1870's. Video student, Jack, helped me document the day by recording the catwalk around the college grounds which I later edited into what is shown in my space.


- - - - - - - - - - - - - - - - - - - - - - - - - - - - - - - - - - - - - - - - - - - - - - - - - - - - - - - - - - - - - - - - - - - - - - - - - - - - - - - - - - - - - - - - - - - - - - - - - - - - - - - - - -

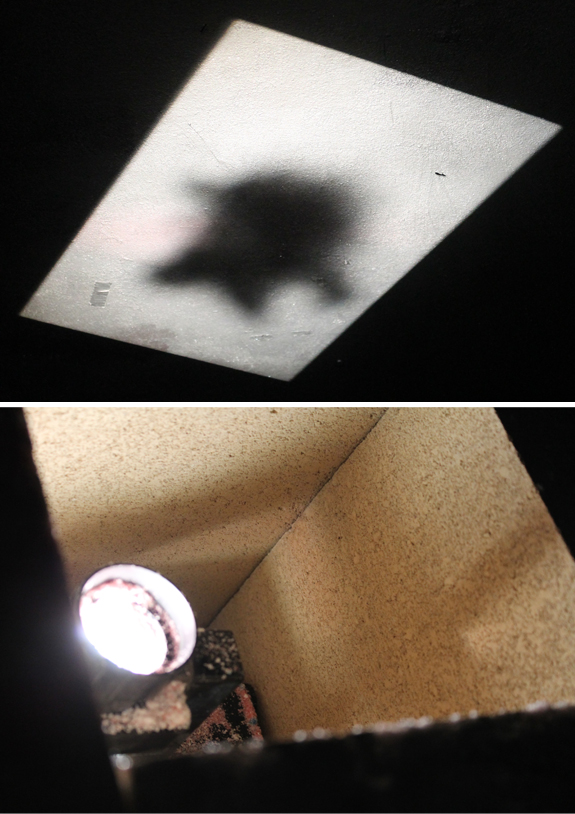
Jodie Gorrell - Umbra, Penumbra, Antumbra

With inspiration from my pathway project, I carried on researching into light and in particular the contrast of dark and light which links to the title of the project. I wanted to make a piece which could be an experience for the viewer. An artist I was most interested in is Bruce Nauman whose work I visited at a museum in Berlin. His piece was in a large empty room which was dark and cold upon entering, the piece was a structure in the centre of the room with little light within the piece.
I made various little structures to experiment with shapes and sizes as I was interested in making a structure which resembled the design of a cave – a dark and confined space. I visited various places to research spaces and light. The Deer shelter at the Yorkshire sculpture park was intriguing as James Turrell turned a former deer shelter into a simplistic sitting space with a skyspace. I liked how this piece as the skyspace linked the stone structure back to the outside world, allowing the light to enter the space and affect it differently each time. In contrast, I visited a dark space which was formerly a lime kiln on Traeth Bychan, a beach in north wales. Now surrounded by trees and nature, centres at the back of the beach only accessible when the tide is out, upon entering the structure it was a cold dark and damp stone structure.


My exhibition piece began quite early as it was a space which I chose to begin using to experiment with the light within the space. I looked into how light could enter a space in a small amount through the use of objects such as a cone. This was transferred when I began using the larger office space to experiment my ideas, originally thinking of using large tube shapes which would enter the space, bringing the only light source. I began to cover the window to block off light, then cutting into the window to see how this affected the light entering the space. The window in the space was partly cut off by a side wall so leading to my exhibition, the space was extended with a new wall being put in so that the two windows were fully in my space. The original idea was to use these two windows for separate pieces. I decided to paint the left side of the room black, with the right side of the room staying white. After talks with my tutors I planned to have one static and one kinetic piece in front of the two windows.


My final exhibition consisted of two parts; the first was a sectioned off space, the inside painted entirely black with a projector placed on a table in the corner, surrounded with blocks to cover the front, and a fan placed in another corner on full blast. I really am happy with this final piece but it was a struggle to get to the end point, as there were many things I had to keep taking in to account for the piece such as the arrangement and the amount of light that was entering the space unwantedly. The second part to my exhibition is a space painted completely white; (excluding the floor and window frame) it consists of a wooden frame with layers of glass within it which each have some part covered by layover paper. I like the simplicity of this and the strong contrast to the first piece.
Overall I am pleased with my FMP and how it has turned out. Looking back I think the exhibition would have been easier to finalise if I had a more final idea earlier on.


- - - - - - - - - - - - - - - - - - - - - - - - - - - - - - - - - - - - - - - - - - - - - - - - - - - - - - - - - - - - - - - - - - - - - - - - - - - - - - - - - - - - - - - - - - - - - - - - - - - - - - - - - -

Bronwen Lovegrove - Reality

For me this project has been a purely experimental and theoretical- it began simply with a title "reality" and that is the only starting point I had. My project took shape after researching artists Ryan Gander and Adam Curtis. Their exhibitions "Locked room" and "It felt like a kiss" influenced the visitors reactions and emotions without them knowing and even continued to affect their lives for months afterwards .Their work with the public is the main influence and force behind my work. During all my other projects and especially the pathway stage I hadn't really explored anything other than physical art and traditional methods for example sculpture architecture and human form. Although I love painting and drawing I found it refreshing and eye opening to take a different more contemporary approach compared to my pathway stage. My work is more documentary and contextual piece more about the process and the idea rather than an aesthetic outcome.


My project has taken many different directions first exploring the possibility of creating false identity's and trying to bring them to life by giving them personal possessions and characteristics and a history. This was one of the most exciting parts of my project for me. Like Cindy Jernigan who documented the everyday brick-a-brak I found collecting the contents of pockets and the rubbish inside of wallets very revealing because each receipt and scrap of paper, old leaflet or ticket told something of the owners life and history-however small.


My project became more about the peoples personal response to my characters rather than the actual work. Therefore, I began a series of social experiments to see how individuals react when confronted with uncomfortable or confusing situations. From my experiments the main thing I learnt was it doesn't matter how the viewer responds to my work- what matters is that got a response. This led me to take my work outside of college and start working within the community as I had less restrictions and more freedom.
The idea for my final piece came from the original coats I made at the beginning of the project. Each wallet belong's to made up character with a fictional history however by sending these wallets out into the community people have interacted with them and worried and cared enough for these "fake" people that they have made the effort to return the wallets. In their minds the wallets were returned to real owners and that's enough for me!


Finally this course has given me the confidence to explore things I wouldn't usually, and take risks this has forced me to work outside of comfort zone. Also because it is more independent learning I have had to rely on my own ideas and motivate myself, however I has benefited from this and I think it has prepared me for further education.

- - - - - - - - - - - - - - - - - - - - - - - - - - - - - - - - - - - - - - - - - - - - - - - - - - - - - - - - - - - - - - - - - - - - - - - - - - - - - - - - - - - - - - - - - - - - - - - - - - - - - - - - - -


Chloe Weightman - Documenting People

In the beginning of my FMP I decided on the theme of documenting people over a certain time in their life to show how different people react to certain things going on in their life. I chose 3 individuals from Art Foundation to document which were all working with different pathways of Art and Design. There is Kathleen who has specialised in Costume making and Textiles, Claudia who has specialised in Illustration and Ryan who has specialised in Architecture. I planned to document each person in the same way asking them the same set of questions as the weeks went on to show their development towards their FMP as exhibition approaches.


I decided to document this by getting each individual to keep a diary throughout their FMP noting down anything they wished which was relevant to their college environment at this time and anything which had an effect on it in either a positive or negative way. I allowed them to write any personal information which they felt comfortable included.


The idea of the diary keeping came from the TV series 'My mad fat diary' shown on E4 based on a teenagers life. Alongside the diary keeping and the questions, I have photographed each individual's studio spaces each week to show the changes going from week 1 with their empty spaces right up to their exhibition spaces being complete.


Half way through my FMP I noticed that the information I was getting from 2 of the individuals weren't in as much depth as the other which gave me the idea of going down the root of having Ryan and Claudia's diaries locked away and not accessible while having Kathleen's open for people to view. The idea of doing this got me thinking of how to display it in exhibition which was when the plan came up of having 3 plinths displaying the diaries but all differently. I would have Ryan's diary inside a plinth lying half way down with a plastic surface on top to make it non-accessible, for Claudia's diary to be the same but inside the plinth 3 quarters of the way up and Kathleen's sitting on the top to be read in exhibition. The reason behind the displaying to be this way is because of how much information I was


getting from each persons. Ryan I say I got the least information from which explains his diary being lower than Claudia's and Kathleen's being like an open book to match the way her personality has been shown.

I have included audio for each person asking them the same set of questions but displayed differently. Ryan's audio would be muffled so it's almost not understandable, Claudia's to be understandable but hard to hear and Kathleen's to be clear having it this way to match the layout of the diaries. The images displayed are from week 1 of studio spaces which are also displayed in the way to link to the rest of the set up.


- - - - - - - - - - - - - - - - - - - - - - - - - - - - - - - - - - - - - - - - - - - - - - - - - - - - - - - - - - - - - - - - - - - - - - - - - - - - - - - - - - - - - - - - - - - - - - - - - - - - - - - - - -

Jessica MacGlashan - Fit to Print

The concept for my Final Major Project was fit to print where I could make repeat patterns to fit any surface but being from a fashion and textiles background I decided to print my design onto basic garments to liven each garment up. I made these designs on Photoshop and made repeat patterns. These design I made where from tracings, scanned images and collected tickets and maps from my trips to Berlin and London. From these I designed repeat patterns in Photoshop. These repeat patterns I made were a success I personally think and I also made samples based around the fashion designers and artist work I looked at and made little representation of each work I look at then sampled them.
When coming to make my garments I needed to use plain white fabric (poly cotton) so I could easily add my Photoshop designs onto each garment. With my garments I firstly did some trend research, so from my trend research I finalised my garments to a cami, crop top, A line skirt, midi skirt and a shift dress. I made these garments from templates from some of my own clothes which I had to expand on as my clothes wouldn't fit everyone. I still didn't make my two skirts big enough so from that I had to add in button detail so my models who would wear these garment could easily fit into my garments.
When coming to display my work after tutor and peer talks about my final exhibition I decided to make a fashion flip book for people who come to look at my work can play and swap my designs around making my exhibition fun and interactive. Making this flip book was very tricky and time consuming as when it was first put up the wood pages kept falling off so after adding metal rings it made the wood more sturdier but then I also hit another problem with the copper rings not being able to hold the weight of all my wooden boards which is something I'll again have to fix. I have also displayed my garments which are on the flip book so people can see what I've designed and made. I was going to add tags to each of my garments to link them up to each design which is on the garments in the flip book so people can see that my flip book and the garments both link and relate but I ran out of time to create these tags.

- - - - - - - - - - - - - - - - - - - - - - - - - - - - - - - - - - - - - - - - - - - - - - - - - - - - - - - - - - - - - - - - - - - - - - - - - - - - - - - - - - - - - - - - - - - - - - - - - - - - - - - - - -

Jessica Pierce - Perfect Landscapes

When I first started this project, I set out to discover what makes a perfect landscape and to construct models. I wanted to see if the real beauty of a landscape was the natural form or the ways in which it is edited and adjusted to make it aesthetically pleasing. I did everything that I had set out to do in my statement of intent although some ideas did change but I stuck to my original idea of a perfect landscape.
I researched all of the artists I set out to in my statement of intent, I used these initially for my work e.g, James Casebere who created model landscapes which inspired the diorama I made. Later in the project, additional artists were suggested by tutors which helped inspire some of my final developments. The inspiration I gained from the artists I researched was not only ideas based but techniques as well, many of the artists I had looked at had used the rule of thirds technique which is present throughout my project.
My initial idea was to make a diorama of a perfect landscape, I chose to do this first as an experiment which did not work, this made me change my overall ideas for the project, I continued experimenting with my imagery using both Photoshop and Lightroom. I experimented with a range of different processes and techniques with my images, all of which helped me to create some of my final images. When it came to my exhibition and final piece, I wanted to make something that represented the ideas and concept that I had developed towards the end of the project, I used different materials in my development as I constructed these out of hardboard.
Throughout the project I have summarised my work every so often, annotated every part of my development process and after each week I have written a summery/evaluation of that week and how my time plan has changed from my original. Also, I met with my tutors on a regular basis to discuss ideas and have conducted group and peer crits of my work to push my evaluative skills and my project further.
Overall, my final piece was a success. I didn't discover one specific "perfect landscape". I discovered that every individual perceives the world differently and one persons idea of perfection may not be anothers. I feel I created a final piece that lets the viewer construct their own idea of a perfect landscape. However, if I were to develop this idea further I would experiment with different landscapes such as a room or a cityscape to broaden this investigation.


- - - - - - - - - - - - - - - - - - - - - - - - - - - - - - - - - - - - - - - - - - - - - - - - - - - - - - - - - - - - - - - - - - - - - - - - - - - - - - - - - - - - - - - - - - - - - - - - - - - - - - - - - -

Joseph Thomas - Home, Work, Social and Holiday

I started by looking into the work of Martin Parr and Tony Ray Jones and developing on their idea of stereotypical Britain. My idea I started with was just going to be of Skelmersdale and other similar areas, but looking into more depth and different areas that wouldn't necessarily be grouped together on first thought.


I worked in this whole project shooting in film but there was problems with some of the shoots I went on weren't successful because either the film itself was bad or when I developed them myself in the dark room the chemicals were old so the images either didn't come out properly or not at all. This happened on two of my shoots the first at the social club and the second and skelmersdale so I was on limited to how many images I had for that book.


The images that I gathered I was happy with and the overall quality of the books that I made in college looked nice as well but I have got them published on the internet but the time It has taken them to arrive meant they haven't arrived in time for the group critique. I have also got some prints made up to go up in my exhibition if I decide to use them.


I think the overall work was a success but if I had more time I would develop it further, I would look deeper into the individual subjects and speak to people that they would relate to and gather a different aspect to and deep subject to cover, it's a subject that can be explored into many different fields as I only covered four of them it could branch off into so many and maybe not so obvious fields.


- - - - - - - - - - - - - - - - - - - - - - - - - - - - - - - - - - - - - - - - - - - - - - - - - - - - - - - - - - - - - - - - - - - - - - - - - - - - - - - - - - - - - - - - - - - - - - - - - - - - - - - - - -

Mollie Ducharme - Nothing Really Matters

Nothing Really Matters.


- - - - - - - - - - - - - - - - - - - - - - - - - - - - - - - - - - - - - - - - - - - - - - - - - - - - - - - - - - - - - - - - - - - - - - - - - - - - - - - - - - - - - - - - - - - - - - - - - - - - - - - - - -

Saskia Tobiasen - The Space In And Around A Cube

The foundation of my project comes from the work I did in my short project "10". The project was based around the idea of the space in and around a cube this was influenced initially by the work of Sol LeWitt. His work is largely based around squares and cubes in a variation of wall drawings and sculpture. I started by making small scale sculptures out of sugar cubes which I photographed and did quick sketches of which later worked towards larger scale pieces made from 2x2 and 4x4 wood that I created more permanent sculptures with that became a plan for my final piece. In this process I also looked at Rachael Whitereads 'Embankment'.
When it came to planning my final piece the main problem I faced was the cost of material to put together a successful piece on such a large scale. after playing with different materials I looked at the idea of scaffolding and how that could make a strong structure. at first I looked at metal scaffolding and searched around to get hold of some but it was difficult to find scaffolding that was for sale rather that to borrow so I explored my options further and looked into other methods of putting scaffolding together, a large part of this research focused on Chinese bamboo scaffolding, this is something that I could get hold of easily and do for a lot cheaper as well as it being a more flexible and playful material with interesting visual qualities. I played around with a small amount of bamboo garden canes to trial different ways that I could assemble them and create a sturdy free standing structure. I tried taping it, tying it with garden cables and drilling holes which I looped and twisted garden wire through. The garden wire was the most sturdy material to hold the canes together. after planning my piece in my assigned space I purchased a large amount of bamboo garden canes and wire and started to assemble them but as I did so the structure became very cage like and lost its interesting visual qualities. so I took its down and instead of working in a structured orderly way I focused on making a very dense structure which I continued to grow my model around by extending and building from it which created an interesting flow in the piece creating pockets of open space and dense areas that made interesting shadows and lined that carried the eye through the piece.

- - - - - - - - - - - - - - - - - - - - - - - - - - - - - - - - - - - - - - - - - - - - - - - - - - - - - - - - - - - - - - - - - - - - - - - - - - - - - - - - - - - - - - - - - - - - - - - - - - - - - - - - - -

Lauren Evans- I Like Art Foundation

During the foundation course I have learnt new processes and developed on skills I already have which I have enjoyed doing. I feel as though I have been more independent than ever towards the end of the year as we started the FMP which I see as a positive aspect to the course as it will prepare me for my Illustration course at university in September. The class I have been working with throughout the past year were mostly fine art students and fine art teachers however my passion is illustrative art, with this in mind I felt I worked better independently. However I feel like I would have had a better opportunity to excel further if I was in a class that was more centred on illustration and graphic design which would have been more beneficial to my development in group critique. Overall I am really happy with my final pieces and the progression of my journals. I also think tutorials with Ann have made my annotations much more detailed and I can refer back to previous techniques and artists. She also suggested many artists that related to the topic of my project which helped a lot.


Another good thing about the foundation course is that it is nice to share opinions of other people's pieces and to also receive positive and constructive criticism to help redevelop the project. My FMP was a success overall, I didn't show a video in my exhibition in the end due to the programme on my laptop not working.


In conclusion to this year I have found the foundation course to be challenging and enjoyable and I feel like some aspects of my work have been a success. . I definitely think if I was to do it again I would make a better time plan for each day at the start of the week rather than a weekly one because of things not going to plan it can really affect the time plan, time management is one thing I need to improve on.


- - - - - - - - - - - - - - - - - - - - - - - - - - - - - - - - - - - - - - - - - - - - - - - - - - - - - - - - - - - - - - - - - - - - - - - - - - - - - - - - - - - - - - - - - - - - - - - - - - - - - - - - - -

Jack Gittins - Empty Spaces

My initial ideas for this project were mainly based around video making and editing, in my previous pathway states and projects I worked with video in at least half of the projects and I realised this year that my main art media I want to carry on using through out the rest of my life if Video producing, I really enjoy the process of making a video; the travel and the places it takes you, the people you get to meet and the wide variety of subjects you can portray through the media. In this project I have also worked quite in depth into architectural illustration using Adobe Photoshop, I have learnt a lot more about myself and the skills to learn more that I possess. With my video making I have always been self taught throughout the years of on and off video making and this year especially this FMP project has been extremely effective for my skills and teaching myself new ways to do things and get around problems.
I was searching through the depths of the inter web looking for inspiration and a starting point, the fact that I had to write my own brief was hard to get my head around but I managed it and got started with a video Piece I found on video called 'The Dream' which got me really inspired to make a piece of film. I started with some footage I got the train between Manchester and Bolton, this footage I edited together and the techniques I used that the video 'the dream' had also had involved. After this video I began to search again for a video I could respond to, I then found a timelapse piece from new york city that really inspired me so I began to gather timelapse photography footage over a few weeks, this was the starting point for my next video. For this video I really wanted to capture the audiences attention but subtly and have an uneasy atmosphere so I tried to edit it in this way to have this effect over the audience and the viewer, I think that I captured this quite well when I had a trial run of the video and showed it to a few students in my class in a group critique session, there were things that I missed and had to tweak and finish but It was fine, for my exhibition I was talking with my tutor and came up with the idea of video projecting my video onto a large ball but I tested this technique but the image was distorted and I didn't think the video had the same edge about It so I decided to cancel that idea and just project my video how I normally would and It looks perfectly fine, I did how ever come under some bad luck where the plinth that was holding the laptop and projector fell of the wall causing some minor problems but nothing too serious to fix.


- - - - - - - - - - - - - - - - - - - - - - - - - - - - - - - - - - - - - - - - - - - - - - - - - - - - - - - - - - - - - - - - - - - - - - - - - - - - - - - - - - - - - - - - - - - - - - - - - - - - - - - - - -